Screen recording is one of the greatest features that iOS has introduced to its users. It allows you to record gameplays, tutorials, video calls, and all the important moments. Screen recording on iPhone is a cakewalk, and even a new or first-time user can do it without much hassle. This guide provides a simple walkthrough on how to screen record on iPhone, along with some helpful tips and solutions to common issues faced by users.
Why use Screen recording?
- Recording Gameplay to share with your friends
- Record a video tutorial
- Record video calls or streams
- Capturing troubleshooting problems to send to technical support
- Keep a copy of your reels, stories, or posts
- Saving live streams
- Demonstrating apps
How to add screen record on iPhone?
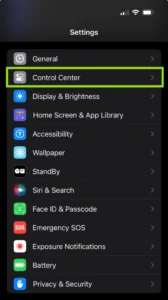
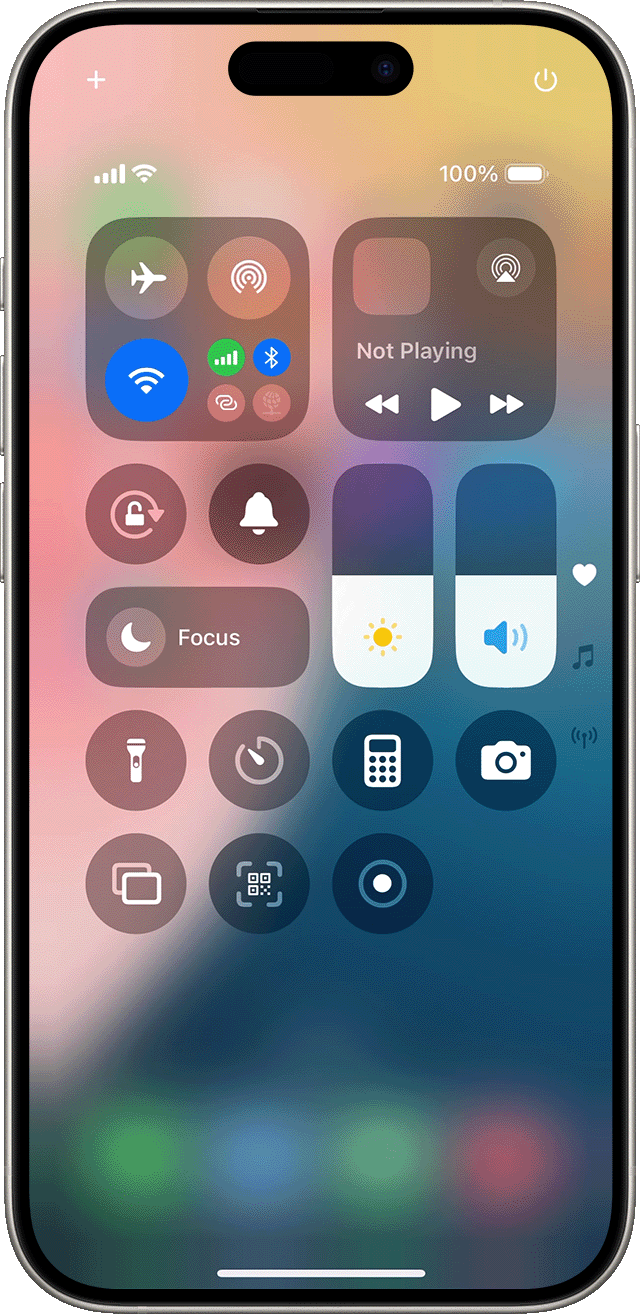
Before accessing the screen recording feature, ensure that the screen recording icon is available in your control center.
1. Tap on Settings.
2. Go to Control Centre.
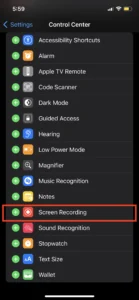
3. Tap on Customise Control (Older versions) or More controls (Newer versions)
4. Find Screen recording. Tap on the green ‘+’ icon beside the screen recording.
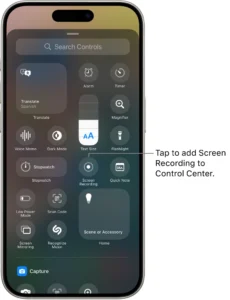
5. Now, you’ll get the Screen Recording icon on the Control Centre
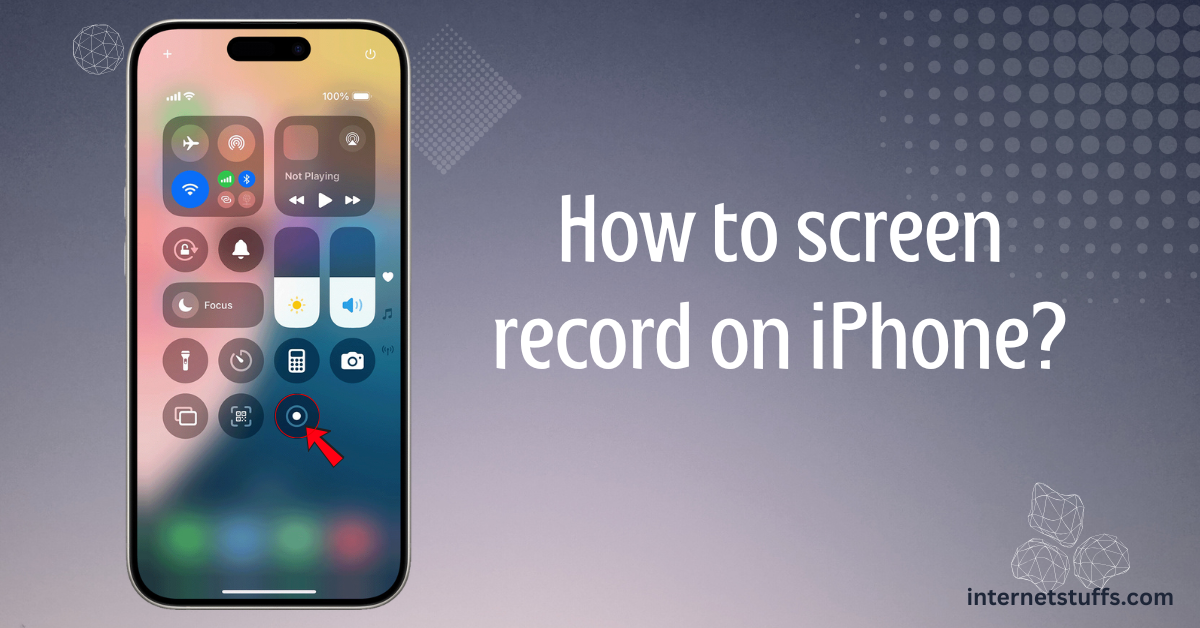
How to screen record on iPhone?
Once added, you can easily start screen recording on your iPhone by following these simple steps:
- Swipe down from the right corner of your screen (iPhone X or later) or swipe up from the bottom of the screen (iPhone 8 or before).
- Tap on the record button (Red circle with dot inside)
- A 3-second timer will start to give you enough time to prepare yourself.
- A red capsule or status bar will appear, indicating that screen recording has begun.
- To stop screen recording, click on the status bar and press “Stop,” or you can simply tap on the screen recording button and the recording will be saved.
How to Screen Record with Sound on iPhone
To screen record with external sound on iPhone, follow the steps below:
- Long-press on the screen recording icon from the control centre.
- The microphone option will appear.
- Select it to record the screen with voice.
- The mic icon turns red, indicating the mic is active.
Where is the recording saved?
- The screen recording is saved on your device.
- It can be accessed through the built-in Photos app of the iPhone.
- You can edit the video by trimming the start and end, adding filters or text, and adjusting the speed.
- You can also use third-party apps, such as CapCut, Loom, Snagit, Camtasia and iMovie, to enhance your photos and videos.
Does iPhone screen recording reduce quality?
No, iPhone’s built-in screen recording feature does not reduce the quality. It records at the native resolution of your screen pixel-by-pixel (typically 60 FPS). There are no settings to change the iPhone screen recording quality. However, certain factors influence the quality of iPhone screen recording.
- iPhone model
- Frame rate of the original screen
- Storage
- Low storage can make the video slow and choppy
- HVEC and bitrate
- iOS uses HEVC and bit rate(data used per second) to compress the video. Hence, a static screen will have a smaller bitrate, and the video size will be small. A gameplay or tutorial video will have a higher bitrate, and the file size will also be larger.
Quick tip: You can change the resolution of iPhone screen recording using Third-party applications like CapCut.
How to change the resolution of iPhone screen recording?
iPhone doesn’t have an in-built feature to change the resolution of screen recording. To adjust the resolution, you need to download third-party apps like CapCut.
1. Install the Capcut app from the App Store.
2. Click on new project.
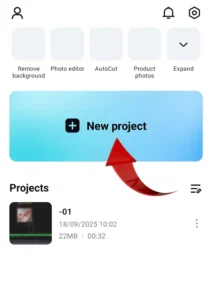
3. Add the screen recording you want to change the resolution for.
4. A drop-down button showing your current resolution will appear at the top right corner.
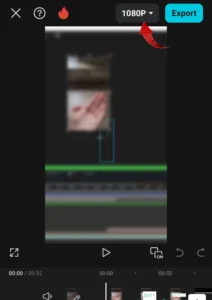
5. Click on the drop-down menu of the Resolution button.
6. Adjust the screen resolution, FPS rate, and code rate.
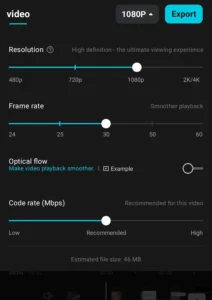
7. Export the video at your desired quality.
Tips for better screen recording on iPhone
- Plan to ensure that the video is shot smoothly.
- Enable Do Not Disturb to avoid notifications popping up on the screen during the screen recording
- If the video is to be recorded in landscape mode, ensure that you hold your phone in the same position throughout the recording.
- Make sure you have enough storage to store your screen recording effortlessly
- De-clutter your phone and delete all the unnecessary apps before starting the screen recording, especially while shooting tutorials.
Troubleshoot common problems
Privacy Restrictions
Check privacy restrictions before starting the screen recording – Go to Settings > Screen Time > Content & Privacy Restrictions
iOS version
Make sure your iOS is updated, because an outdated version may cause problems while iPhone screen recording.
Technical glitches
If there are glitches, restart the phone. If the issue continues, contact Apple support.
No sound in the recording
-
- Check if the ringer is on (Phone is not on silent)
- Make sure the Microphone icon is on while screen recording.
- Some apps may restrict screen recording with voice due to copyright issues
Screen mirroring
If you are screen mirroring your device with other devices, such as Apple TV, Screen recording will not function. You cannot screen mirror and screen record at the same time.
Recording not found
If your iPhone screen recording is not visible in the In-built Photos app, check your storage and make sure you have enough storage to store the recorded video.
Conclusion
iPhone screen recording is a breeze, no matter if you’re rocking an iPhone X or the latest iPhone 17! If you’re eager to capture your screen activities in just a few simple steps, you’re in the right place. Dive into this quick and easy process that will have you recording in no time!
Frequently Asked Questions
How do I turn on screen recording on my iPhone?
Go to the control center > Click on the screen recording icon, and your recording will start in 3 seconds
Why can’t I find the screen record button on my iPhone?
If you cannot find the screen record button in the control center of your iPhone,
Go to Settings>Control Center>More Controls> Screen recording
How do I record iPhone screen?
Go to the screen that you want to record and start screen recording from the control center.
Check out the blog on How to Transfer WhatsApp Chats from Android to iPhone: 7 Powerful and Easy Steps for a Smooth Move to gain valuable insights!